Posts

Showing posts from November, 2011

Pallet Compost Bins

Image
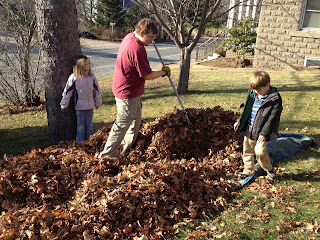
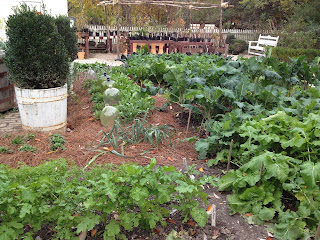
Another trash-to-treasure accomplishment from this past weekend? New compost bins made of out of the pallets leftover from all the bricks we used back in the summer. Up to this point, our compost piles were incredibly slap-dash. When we moved in, we knew we wanted to get them started, so we used some wire fencing to make big, circular corrals for our leaves, kitchen scraps, and garden waste: As you can see, they are neither attractive nor particularly sturdy. The one on the right has fallen apart, but that also reveals that, after two seasons of breaking down, there's some nice, dark stuff in there. Still, after going to all the trouble of designing and building our dream garden, it would be a shame to spoil the view by leaving piles of crap around the edges. In fact, our compost bin design helped us deal with not one but two piles of crap at the same time: We had a dozen or so pallets in varying conditions from all the bricks stacked up in the driveway.

Fall Clean Up: Use What You Got

Image
Looks like I made the right call by refusing to rake leaves until they had all  fallen. That decision was not only more efficient, but it also set us up to take our time with the fall clean-up over the long holiday weekend, and it let us do it in the comfort of temperatures in the mid-60s. It was a little disorienting to feel like three seasons were mixing together, but it was way more enjoyable than it usually is. We have taken down several trees since we moved in, but we still have a gigantic maple in the front yard. This tree manages to dump leaves absolutely  everywhere , so raking is a pretty big job (there are two other deciduous trees in the back that contribute too, but nowhere near the way the big one does). It's good to have lots of help: The kids did a lot of jumping, but they also stood on the tarp to hold it down while Kirk pushed the leaves onto it. Then everyone grabbed a corner to lug the pile to the back. This was repeated several times. While that was ha

The Great Brussels Sprout Experiment, Part 2

Image
It feels like much, much longer ago, but about three weeks ago , I broke off many of the leaves on our Brussels sprouts plants to encourage the buds to fill out to an edible size. I also fertilized, watered, and gave a little love to these plants. The only other thing we did for them between then and now is added a hoop house over them to keep them from freezing and to try to encourage them to grow, even though the season really ought to be over. Our Brussels sprouts were nowhere near ready for Thanksgiving dinner, so we bought some from Tendercrop . As a point of comparison, here's what they look like when grown by people who know what they are doing: And here's what ours looked like as of today: Not at all impressive, although a few are plumping up here and there. the best ones are on the small stalk that I accidentally beheaded while pulling the leaves off a few weeks ago: Looking at this one — the one that I was pretty sure would die without any leaves

The Lessons of Thanksgiving

Image
My original plan was to take some pictures of all the vegetables we used from the garden for Thanksgiving dinner, then show how we prepared them in a series of before and after photos. This plan went well first thing in the morning when we went out to pick what we needed: Clockwise from the top we have mixed greens and herb salad (lettuces, arugula, kale, beet greens, mint, and cilantro), cabbage and broccoli, frozen green beans from earlier in the season, frozen peas from earlier in the season, a jar of dried sage, chives, and carrots. My Thanksgiving photography took a nosedive as the day went on, though. I took only one other picture all day, and it wasn't of prepared food or even of the kids. So instead of a big recipe extravaganza, here's what I learned yesterday: 1. It takes three times as long to pick damp vegetables on a freezing morning than it does to pick them later in the afternoon. This is because you have to stop several times to thaw your wet, frozen

Garden Tour: The Colonial Nursery

Image
The Colonial Nursery is a actually one of the sites that you can visit without purchasing a ticket to all of Colonial Williamsburg. This is because, in addition to being a period garden, it is also a store. All the shops are open to the public at large, so it is possible to do some sightseeing on the cheap if you are so inclined.  Below is a photo of the fall garden. You can see, of course, lots of greens and brassica. In the center of the bed are leeks: We have been thinking about leeks in the last few days. Kirk is currently reading John Seymour's The Self-Sufficient Life and How to Live It , and his description of leeks is worth sharing: In cold, wet areas, this is one of the most useful plants, for it stands the winter and provides good  food and vitamins in the months when little else has survived except kale. Onions are hard to grow  and to keep, but leeks are an easy substitute. The Welsh are very sensible to have this excellent plant  as an emblem and not so

Garden Tour: Governor's Palace Pleasure Gardens

Image
I have a feeling most visitors to Colonial Williamsburg do their ooh-ing and ahh-ing over the pleasure gardens at the Governor's Palace, not the vegetable garden . They are lovely, although definitely less lush in November than they must be in the height of the summer. Still, the "bones" of a Colonial garden, especially in the South, consists of its boxwood hedging and edges, and that part is every bit as green and beautiful at this time of year — perhaps more so, since without all the flowers, the architecture of the boxwood gets top billing. First stop? The maze: This photo gives a good idea of the scale of the privet maze. The kids really enjoyed it, although I don't think it was as challenging as I remember it being. As you can see in the photo just to the left of the children, not all of the hedges are fully filled in. I'm not sure if this was due to the time of year or a recent pruning, or if the bushes are just in a phase of being thinner than in

Garden Tour: Governor's Palace Kitchen Garden

Image
After exploring Great Hopes Plantation , we continued on into Colonial Williamsburg proper to the Governor's Palace . After the tour of the inside of the building (which has been recently redecorated, by the way, to reflect what it would have been like with a family living there instead of just a bachelor governor), we went out to the grounds. In the South, colonial kitchens were housed in an outbuilding. Below you can see the (quite large) kitchen for the Palace: The brick kitchen buildings stand at the top of a terraced kitchen garden that extends quite a distance down the slope to a pond. It is hidden from passersby on the street by the brick wall. The Palace itself is behind what we see of the kitchen here. Not surprisingly, we see kale and collards in these beds, as well as some fruit trees on the ends that are going dormant (my guess was figs and peaches, but it's hard to tell when they are almost bare). This view of the kitchen is from the bottom of the

Garden Tour: Great Hopes Plantation

Image
If you've been wondering why I haven't posted in a while, there are two reasons. First, I have been in and out of the hospital for a heart condition (no worries — I'm cured!). Second, last weekend we traveled to Richmond, Virginia to visit friends and for Kirk's first marathon (no worries there either — he finished!). Since I am staying home to rest from now through Thanksgiving weekend, I will share some of the excellent gardens and farms we visited on our trip. First up, Colonial Williamsburg. Kirk and I have been to Colonial Williamsburg several times, but this was the kids' first visit. It had been about a decade since our last visit, though, so we were excited to find a new area: the Great Hopes Plantation . This is a re-creation of a Virginia farm around the 1770s, and it shows traditional gardening and farming techniques as well as what life would have been like for slaves of the era. There's still quite a bit going on in the farm garden. Will

The End of the Peas

Image
Today I ate my the last handful of snap peas from the garden. There were a few left that were still sweet and delicious, but mostly what's left of the peas look like this: Earlier in the fall there were still many good pods left on vines that didn't look so hot, but now I think they've been frostbitten. Several pods that looked plump and ready to shell were soft when I went to pick them, a sure sign that they froze and then thawed. Anyway, over the course of several weeks I have picked and shelled regular green peas and processed them to freeze for the winter. To do this, you blanch them for two minutes (blanching is just boiling them quickly): Once the two minutes are up, you drain them (I am using a two-piece pot and strainer above, which makes this a breeze with tiny peas that could otherwise be a pain to try to pour the water off of). Then you quickly submerge them in ice water to stop the cooking process: As you can see above, I keep mine in the stra

Herbs for the Winter

Image
In addition to the basil that I cut and dried back in October , I also brought in some other herbs to dry before the first expected freeze . Those are now completely dried, and today I put them in mason jars to store them: From left to right are sage, tarragon, and marjoram. At the time, it felt like I brought in armloads of herbs, but when they dry, they really shrink down. In the middle of the summer it seems like there's no way you could ever use all the herbs you plant, but drying them for storage is a whole other matter. Now I don't think there is such a thing as planting too much! I also cut several bunches of the cilantro that is still growing in one of our greenhouse tunnels. We managed to time this perfectly, because the colder weather has kept it from going to seed — something that I've never been able to keep on top of in the summer. Anyway, I only brought in a fraction of what is out there:  So I was thinking that this was a gigantic bunch of

Cold Frame Dinner

Image
Remember the harvest from the cold frame this past weekend ? First, there was a basket of kale. We turned this into an appetizer of kale chips. I realize that if you haven't heard of these, it probably sounds pretty gross. But really, they are quite delicious, and might be addictive. They are also super-easy to make. Drizzle some olive oil over a cookie sheet and toss the kale leaves around on it so they get a light coating. Sprinkle with kosher salt and bake at 350 for about 15 minutes or until the edges are brown (not burnt). That's it. The flavor is kind of toasty but still green, and it's really good. Make sure the leaves are about bite-sized, though (or tear them to be so). We found out the hard way that once you bite into them, they pretty much disintegrate, so it's best as a one-bite snack. We made them plain with just salt, but I could definitely see seasoning them with chili powder or curry powder, maybe onion salt or a little garlic powder …

A Look at the Cold Frames

Image
In addition to the greenhouse tunnel , we also have a couple of cold frames in the garden. They were built to size for the garden beds in the old house, so they are not four feet wide to fit our new beds. That's why we have those rows of pea trellises behind them: Inside the cold frames above are beets, carrots, mesclun, and arugula. To the right is an empty-looking frame that used to have turnips, but now that those have all been pulled, there are new mache and spinach seedlings in there. The cold frames, by the way, are just boxes that sit on top of the raised bed. The back side is higher so that the glass (recycled storm windows inherited from a friend) sit on a slant toward the winter afternoon sun. We could probably insulate these further with bales of hay around the outside or by having them inside a green house tunnel for double the heat capture. Part of our winter gardening will include finalizing plans for winter greenhouses to use next year that are better than

The Forgotten Radish

Image
While out and about in the garden yesterday afternoon, I came across this guy: That is a radish. We must have missed it when we pulled them up (much) earlier this fall, and this is what happens when you let them go: you get a radish that is almost as long and as big around as your foot. I'm not sure how edible this will be — I'm thinking it will have a pretty big bite to it. Our plan is to grate it and use it sparingly over a salad, unless it is just too terrible to eat at all, a la Scarlett O'Hara's garden .

Touring the Tunnels

Image
Today turned out to be pretty warm, although it began at a frosty 29 degrees Fahrenheit. For readers abroad (and according to my stats, I have readers in Russia and Germany, as well as old friends in other far-flung places!), that's about -2 degrees Celsius. That left my newly de-foliated Brussels sprouts looking unhappy, and when I went out to get a closer look, their leaves were definitely frosted over. So I took a page out of the Farmer Boy playbook and poured water over the frosted plants while they were still well shaded early in the morning. That melted the frost off before the sun hit them, and they seemed no worse for wear as the day went on. So while we mull over whether or not to get those Brussels sprouts under some greenhouse tunnels of their own, let's take a peek at some of the things we do have in there. We opened them up today to get some air circulation going to let the plants dry out a bit — some of our cilantro was a little slimy after being closed up. Th