Posts

Showing posts from March, 2016

Not-So-Mean Martha

Image
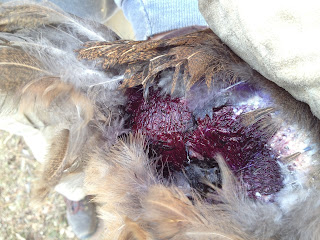
Last week we took Lizzy out of solitary confinement and let her back into the henhouse with the rest of the chickens. Her feathers had grown back in nicely, and it didn’t look like she was pecking at herself at all: no purple beak, no feathers on the floor.  On the other hand, Rachel still had freshly pecked spots around her vent (that’s the egg hole for you non-farmers), so someone else was causing the damage.  Naturally, we suspected Martha, due more to her reputation than to any real evidence. So into the box she went to see if the other chickens would heal without her around. So on Easter morning I went out to check on Martha and Smithy, and was alarmed to see this: There was blood everywhere : I’m not sure that picture quite does justice to the murder-esque scene in there. Here’s a closer look at what we were afraid was going to be a bloody mess of a chest wound: And a bloody mess it was, but not a chest wound. Tiegan came outside help me see

Heeling in the Trees

Image
Our new fruit trees arrived really early this year (March 18, actually). Like anything else, they come in a box: The trees are cushioned in some bubble wrap and come packed with a bunch of damp, shredded paper around their roots. As long as that stays wet, you don’t have to plant the trees right away. Good thing, too, since it promptly snowed .  I get that the ground is technically warm enough to dig in and plant these trees, but because we got them so early from the over-zealous nursery shippers, the snow — combined with our still-partially-frozen compost pile — has made it nearly impossible to plant them in a timely manner.  They can’t stay in a box in the basement forever (if you want them to survive, anyway), so I decided to heel them in while we wait for better weather and a more convenient day to plant. All you do is dig a wide, shallow hole: And then you pop in the tree at an angle so it’s mostly lying down. That protects it from the cold and keeps it

Spring Weekends: A Study in Contrasts

Image
March has it backwards this year. Our lamb-like weather was all at the beginning of the month, when we actually hit ~80 degrees and had to prop open the cold frames so as not to fry our early spring spinach salads: We are also pleased to have some kale to eat until we need that bed to plant something else later in the spring:   But then, if you wait a day or so, the temperatures will plummet and send you squarely back into lion territory: That’s the same kale, this time with several inches of snow on top. The snow came down so hard on Monday that the kids had a snow day: It all melted by the afternoon, but since then it has been much cooler. Seasonable, I guess, but I’m looking forward to April, when spring can begin in earnest and we can start getting some peas and more early greens going.

The Close of Maple Season

Image
Last weekend we had our last sap boil of the season. Though we had collected a decent amount during our final week, the warm weather left us only this last bit by Sunday: So we pulled out the taps and boiled our last buckets down. We ended up with about 11 pints of syrup this year. Not bad, but nowhere near our high of 17 pints in the previous two years. One thing about living in New England is that you actually get a fair amount of reporting on maple sugaring, and larger producers are also calling it quits this year. A radio report I heard mentioned that many farmers were happy with their outcomes if  they kept an eye on the actual temperatures instead of the calendar. That’s because we had the warmest February on record , and the sap was running probably two weeks earlier than normal. And since we kind of couldn’t believe it, we didn’t and up tapping early enough. Our bad.  So this year we missed out on the light syrup that comes early, but that’s no big deal

Strange Bedfellows

Image
Lizzy has almost completed her first week in solitary , and she is not happy about it: That death stare follows you all the way around the room.  On the bright side, the move seems to be good for her overall: only a few feathers on the floor of the cage, and we can see that new ones are growing in well (albeit purple). We’ll have to check the other girls to see if they are still being pecked — could there be a different culprit? Or does Lizzy just not play well with others?  In the meantime, if she thought that cage was undignified before, she’s really grumpy about her living situation now that she has a new neighbor: The MRFRS called us today with a barn cat for us, and since it’s supposed be cold and (gulp) snowy this weekend, chicken and cat cages are side by side in the heated workshop. Here’s our new guy: He’s a five-year-old boy we’re naming Blacksmith, but that we’ll call Smithy. He had a home where he was allowed to play outside and a bes

Dizzy Miss Lizzy

Image
A couple weeks ago we noticed that several of our chickens were having their feathers plucked by some big meanie. My thoughts immediately went to Martha, who was known to bully the younger girls in her quest to replace Dolley as the henhouse’s ruler of the roost.  Martha still hasn’t shown a smidge of purple dye on her beak, though. That would be a telltale sign that she’s pecking at the other chickens, since we’ve been applying Blu-Kote to their sad, sore butts.  And while I’m happy to report that Sally is growing in new feathers nicely, Rachel and Lizzy have freshly plucked bare spots that look red and raw and terrible. To wit: This is Lizzy’s sad butt. It’s not quite as raw as all that — this photo is after we painted it blue, but the color came out more blood-red than purple in the photo. (The idea behind the blue medicine is to help prevent infection and to mask the redness so that chickens don’t keep fussing at it. Unlike bulls, they are  actually incited to

Rendering Beeswax, Part 2

Image
Remember last week when we did our first round of beeswax rendering ? Here’s the result: What we have here are two cakes of yellow beeswax floating atop brown, dirty water. The cakes aren’t nearly as thick as I imagined they would be, and all of the wax fit neatly into our beeswax sieve  when we broke it out of the buckets: The process for rendering the wax a second time is the same as the first. First, we melted it in boiling water for 20 minutes: Once it was all melted, it definitely looked much cleaner the second time around. The waxy water was golden this time, not dirt brown: This time, we added a few layers of cheesecloth to our sieve to filter it when we poured it into a bucket: We also used a much smaller bucket. I was concerned that there wasn’t actually enough wax to make a thick cake in a wide, five-gallon bucket, so I grabbed an extra sap bucket instead. Here it’s cooling on the tile table on the porch, since the drawback of using a m

Hoppy Spring!

Image
I neglected to mention earlier that, in addition to ordering new trees for our orchard renovation , I bought one other new plant. Ordinarily I wouldn’t have, but we were just 99 cents away from the free shipping threshold from Stark Bros. , so I picked up something new to try: hops! Photo courtesy of Stark Bros. Nursery This has always been on our radar, as it’s a very Colonial thing to grow. We haven’t really worked all that hard at making our own alcohol yet, with the notable exception of dandelion wine — not exactly an unqualified success. Still, we have piles of honey now that we could ferment if we want to, and the grapes are doing well. And there are apple trees all over Newburyport that people just ignore, leaving the fruit to drop and rot, so I have my eye on those for a cider project some day. Why not grow some hops and add beer brewing to the project list? So I chose Centennial hops . We should get the vine in a few weeks, along with our other trees. I pla

Rendering Beeswax, Part 1

Image
Though last fall’s honey harvest was complete by December, the bucket of crushed honeycomb left over from the process sat in the basement all winter — until today: It’s still a sticky mess, but not even a little bit worse for wear after a few months (we had the lid on, after all).  Since we got through our (disappointingly small) bucket of sap fairly quickly today, we had space on the fire to deal with the beeswax. So Kirk ran over to Kelly’s  to pick up a new stock pot and sieve — beeswax is pretty messy, so using something from the kitchen was out of the question.  To start, we rubbed some dish soap all over the outside of the pot to try to make it a little easier to clean off all the soot later (lesson learned from not  doing that on the maple syrup pans , which will now blacken your hands instantly). Then we filled it up a third of the way with water and set it to boil: Just as it does in the kitchen, keeping the lid on the pot helps it boil more quickly

Herbal Apothecary: Costa Rican Sun Balm

Image
It’s hard to believe that our trip to Costa Rica was almost two years ago, and even harder to believe that it took me this long to finally make the lip balm I was planning with the ingredients I bought at the cacao plantation we visited .  Though, to be fair, I only just ran out of the lip balm I made over three years ago . Truly, a little goes a long way. Anyway, today I finally gathered my Costa Rican ingredients: achiote and cocoa butter:   This cocoa butter was made by hand by our tour guide Priscilla , so it's unrefined. It still smells good and chocolatey, and the color is tan rather than white: Since cocoa butter is solid at room temperature, I dropped the whole container into some boiling water to melt it: While that was melting, I gathered the rest of my ingredients: beeswax and coconut oil . The proportions here are 1 part beeswax, 2 parts coconut oil, and 2 parts cocoa butter: It all gets melted together and stirred over very lo