Posts

Battlefield: Cutworm

Image
Ugh. These bastards: Earlier this spring we had problems with cutworms in our tomatillos. Now we have discovered that they are in the tomatoes and leeks as well. We lost a couple of our tomato transplants, so I got busy making more collars. We quickly ran out of the toilet paper and paper towel rolls we held onto after the tomatillo issues , so I grabbed the only cardboard-y thing we had lying around the house: Manila file folders. And you know what? They're  perfect  for this job. Here's what you do: Cut the folder in half down the center (on the existing fold). Then cut your paper-sized piece of folder in thirds the short way. This is a piece of cake to eyeball if you use folders with tabs that are 1/3 the length of the folder (as you can see above). Next, roll it up and staple it together. Three times is just right. Make a bunch. It goes pretty fast, even if your kids won't help you out (ahem). Apply to your vulnerable plants. T...

The Bean House

Image
Some new seasonal architecture for the garden: Last year we used bamboo poles to make tripods  to support our pole beans. Around the tripods grew our squash and pumpkins, but there wasn't a whole lot of room left for those vines.  So this year we thought we'd try to maximize the space for the vining squashes by sending the beans up and over the gravel path. As you can see in the photo above, the poles are right around the center (or "keyhole") of our C-shaped bed in the swingset quadrant. Each pole has several beans planted in a circle around it, and after they come up, we'll thin it to just three plants per pole. Hopefully the vines will fill in and grow up to form a shady place for the kids to sit in when they are tired of the swingset.  The how-to on this is pretty simple. We used 10 foot sections of 1/2 inch PVC pipe (which we already own as part of our winter greenhouse setup ). They are held together at the peak with PVC pipe joiners :...

Aerial View: June 1, 2013

Image
It's finally June, and we've gone from cold rain to hot sun. It definitely feels like summer here now, and the garden is starting to look like it, too. Spots that look bare have been recently sown with warm-weather plants like melons, beans, corn, and squash, and earlier plantings are filling in nicely. The swingset quadrant. The fancy new PVC pavilion in the center is our bean house—more on that later. You can also see that all but one of the posts for the grape trellis in the back is in place.  The patio quadrant.  The cold frame is for direct-sown okra, and the wood frame off to the left (mostly out of frame) is our chicken tractor , which is being used to keep critters out of our strawberries. The driveway quadrant.  All of those tan dots are cutworm collars, and hopefully mark a turn in the tide on this battlefront . Again, more on this in a future post. The workshop quadrant.  Here you can see more progress on the...

Flower Friday: May 31, 2013

Image
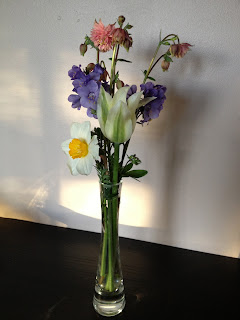
This week marks the last of the bulbs in the cutting garden. It might be a little thin in June until some annuals start to fill in, but there are some interesting shapes and colors right now, if nothing very big.  Tulip, daffodil, Jacob's ladder "Bresingham purple," and columbine "Nora Barlow." This is an updated version of the previous bouquet, swapping out the faded tulip for a yellow "New Moon" globeflower.  Delphinium and Baptista "Starlight Prairie Blues." Peony and hosta. Blanketflower "Moxie" and salvia "Merleau Blue." A closeup of the blanketflower shows how interesting its shape and colors are.  I thought the salvia needed a closeup too, since the color wasn't really coming through in the first photo.

Oven Drying Herbs

Image
This year I'm trying to be a little more focused on herb harvesting and preserving. Last season I just mowed a bunch of each kind down before frost and hung them to dry on the porch. And there they stayed for the winter. It's not at all convenient to go out into the freezing cold when you run out of herbs, and being exposed to extreme temperatures hasn't exactly helped to preserve their flavor. I have read that herbs are at their best flavor just before they flower, so I'm keeping an eye on them this year to harvest them at their peak. So far, so good: horehound, comfrey, and sage were all ready to cut this past weekend.  Sage is easy to preserve because it's pretty tough — just hang and let dry. But horehound and comfrey have very thick, hairy leaves that take a long time to dry on their own. I decided to try a new (to me) technique: oven drying. According to the National Center for Food Preservation , the secret weapon in oven drying is a roll of...

Protecting Baby Fruit

Image
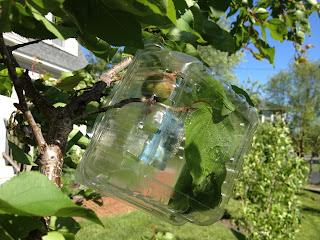
In the orchard, nine out of ten of our older trees blossomed this spring and look to be setting fruit this season. (The new fig tree  we planted at the end of April is still just a stick, albeit one with two small green buds on it.) Our apricot is the farthest along, and although it's not a bumper crop, we have a bunch of small fruits: And, as you can see, I spent some time this weekend rigging up a new anti-squirrel system on the apricot tree. I first saw this idea  over at rootsimple.com  and was able to give it a try thanks to lots of friends who saved up their plastic fruit containers over the winter. Grocery store berry boxes are perfect for this, since they are ventilated, and often snap shut. All I had to do was close them around our baby apricots (which I learned to do gently, since I knocked one off its branch by mistake). Hopefully these boxes will confound the squirrels, and we won't lose our whole harvest to them again this year.  ...

Tomatoes on Eggshells

Image
After a weekend away and a week of terrible weather, we started this weekend well behind schedule for getting our plants in the ground. When the rain stopped yesterday we donned fleece and hats (in May!) and braved the temperatures in the forties to get things going. Today we were finally rewarded with an absolutely beautiful day to finish out our Memorial Day weekend, and one of the things we accomplished was getting all of our tomatoes in the ground.  Before planting, though, we added an extra step to our soil prep. Here's a spring's worth of eggshells we've been saving up: We crushed them and added them to the blender to pulverize them quickly. For the blender to do the job, we had to add water to the mix, making an eggshell slurry: Then Kirk sprinkled it over our tomato beds: The reason for all of this is to add calcium to the soil to prevent blossom end rot on our tomatoes. Last year our earliest tomatoes had some issues with this, so we...