Posts

Showing posts from January, 2016

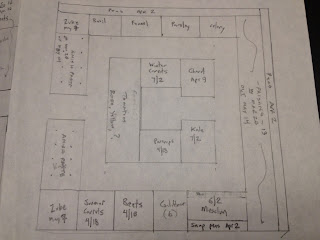
2016 Master Plan: The Driveway Quadrant
Image
The final quadrant of our planning for the upcoming growing season is the one nearest to the driveway: Along the top is a long trellis of peas, which is on the northern end of the bed so as not to shade the zucchini and annual herbs grown in the rest of the area (basil, fennel, parsley, and celery). To the right is another 27-foot trellis of peas. We don't usually orient them this way, but since it's to the east, we are confident that the Roma tomatoes behind it will get enough afternoon sun. The peas will also be gone by July, well before we expect to harvest any tomatoes anyway. Along the bottom are crops that can handle a bit of shade from the house as fall comes. Here we have another zucchini plant, summer carrots, beets, mesclun lettuce for the summer, and a short trellis of snap peas. We also have a block marked out for something new: cauliflower. I have never been a big fan, though my distaste has probably always had more to do with the whiteness of the wh...

2016 Master Plan: The Workshop Quadrant

Image
Another section of the garden plan for spring is the quadrant near the workshop and chicken coop: The right-hand bed of this section is under a small maple tree, which we keep around because it shades the chickens nicely in the summer. It definitely limits our options in that bed, though — no full sun to be had. We've found that salad greens (spinach, arugula, mesclun lettuces, beet greens) started in a cold frame do well here, since they get sun until the tree leafs out in May. If they're reasonably sized, the shade then works to our advantage to keep them from bolting. Weedy cilantro and dill also do well here, so we amend with lots of compost and just have the herbs and greens switch places each year, and it seems to work well. Along the top are still perennial grapes and herbs, which will remain in place (give or take a few small shake-ups of the herb garden that I'm mulling over). On the left at the top is a section for potatoes, though we'll als...

2016 Master Plan: The Swingset Quadrant

Image
Continuing with the garden plans for the spring, here is the swingset quadrant diagram: The full left side is the perennial asparagus bed, so no changes there. Ditto for the top, which is still grapes in the back and perennial herbs in the front. I may end up moving around some of the herbs once they come up in the spring and I see what's there. Anyway, the upper portion of the right side is mostly head lettuce, which will be shaded by a trellis of pickling cucumbers (on the long side) and slicing cucumbers (on the short side). The shade should help keep the lettuces from bolting in the summer heat, especially since the trellises are oriented to block out afternoon sun. The lower half has pole beans along the right side, which will vine their way up poles that arch over the center path. We did this in the past closer to the house, and it worked well to form a shady arbor to support all the beans — like the bean house , but over the path instead. The rest of the bed i...

2016 Master Plan: The Patio Quadrant

Image
We’re a little behind the eight ball this year on the garden planning. Usually we start a new plot of all the vegetable beds on New Year’s Day (or very shortly thereafter). This year we only just got around to this, so we’re about three weeks behind schedule. Though that doesn’t seem like a big deal (we’re nowhere near planting seeds outdoors, after all), it puts us behind on ordering the seeds we need to start. Still, it’s hard to get too  worked up about it when the wind chill outside is just 10 degrees. Anyway, we finally did get our act together and lay out the plans, so here is the patio quadrant plan for the spring: On the left-hand side there is a long row of strawberries. Though we considered moving the strawberries to the other small fruit beds to replace our struggling cranberries , we ended up keeping them right here, where there’s much more room to devote to a crop that has been quite successful for us over the years. Provided everything survives the wint...

Kids’ Corner: Making Honey Fudge

Image
Guest blogger Tiegan shares her experience of using some of our honey harvest to make honey fudge this winter. The recipe is from The River Cottage Family Cookbook .   As a Christmas gift for my parents, I decided to use our honey to make honey fudge. It didn’t turn out to be much of a surprise, though. You will need: 4 cups granulated sugar  13-ounce can evaporated milk (I used 12 ounces) 1/2 cup water (I used slightly less) pinch salt 1/4 cup honey (I used a bit more) canola oil  7 tablespoons butter (I used a little more to put on the top of the inside of the pan so the fudge wouldn’t bubble over) glass measuring cup large saucepan wooden spoon tablespoon candy thermometer jelly roll pan knife 1. Put sugar, evaporated milk, and water in the saucepan. The pan should be no more than a third full.  Place over low heat until the sugar has dissolved. Stir in the salt and honey. Clip the candy thermometer to the inside ...

Feeding the Birds

Image
Did I mention that I don’t have to work on Mondays and Fridays any more? Since cutting back to just three days per week, my quality of life has significantly improved — and I should mention here that the accompanying pay cut was made possible by all those Trim the Fat Tuesday lifestyle changes we put in place back in 2014.  Anyway, I now have time to attend to dozens of little projects around the house and garden, one of which I took care of yesterday, before today’s (very small) snowfall: For Christmas the kids got some very cute bird feeders in fun shapes (owls, trees, snowmen) along with a birdwatching guide. This is something we’ve always wished we had, so we would know what’s eating our berries and peas. We’ve never put out a bird feeder before, since during the summer we are usually trying to keep predators out  of the garden. It also seems a little mean to attract unsuspecting birdies to a killer cat’s home turf , but since we are bereft of a barn ca...

Creamy Birthday Cheesecake

Image
In addition to making Christmas gifts during my blogging hiatus, we also had a birthday to celebrate. Kirk's birthday is just a few days after the New Year, a decidedly un-fun time of the year: Everyone is back to work and school, and the whole world is more interested in dieting and exercising than having even one more day filled with cake.  Still, we always celebrate Kirk's birthday with a special extra-creamy cheesecake, and this year was no exception. He's been having this since he was a kid when his mom made it for him, and it's the best cheesecake you will ever eat. It's super creamy and custardy rather than dry and cake-y like a New York-style cheesecake.  That's because it uses eggs instead of flour. With an assist from Rachel and Sally (pictured) and Louisa Catherine (hiding), I got three very fresh eggs to whip this up: These eggs turned out to have some incredibly orange yolks, so the finished product was more yellow than it...

The Honey Harvest and Sweet Gifts

Image
I haven’t written in a while, having taken some time to grieve , reflect, and celebrate the holidays over the past several weeks. We’re not at all sorry to kiss 2015 goodbye and are hoping for better in 2016.  One thing worth celebrating was our first honey harvest, which we only recently finished crushing, straining, and jarring up . In all, it was about 20 pounds of honey, all of it now in wide-mouth mason jars. Honey doesn’t ever go bad, so it’s very easy to store — we just poured it into clean jars and put a lid on it.  Because it lasts forever, honey also makes a nice gift. Back in December we had a little holiday workshop going in the dining room: I couldn’t share these before Christmas and risk ruining the surprise for the recipients, but now that it’s well and truly January, our holiday gifts looked like this:  The tag features Tiegan’s artwork; the cute silicone honey dippers are from the Stonewall Kitchen  downtown.  We sti...